


Create BDD Project with Selenium + Cucumber | How to Design Selenium Cucumber Framework
Create bdd project with Selenium + Cucumber! Behavior Driven Development (BDD) is one of the trending automation frameworks in Software Industries. BDD framework is supported agile development methodology. Due to better readability and easy design, it’s preferred among Business Analysts, Functional Tester, and project stakeholders.
This tutorial helps you set up your first BDD Project using Selenium, Cucumber, and Java or in short create bdd project with Selenium + Cucumber. In this tutorial, we will explain each step with snapshots and descriptions. Refer below for step by step:
Prerequisite:
- Java should be installed on the machine( if not then follow our step by step tutorial- link)
- Maven should be set up on the machine( if not then follow our step by step tutorial- link)
- Eclipse or Intellij should be set up on the machine ( if not then click here for Eclipse Download and Link for Intellij Download)
Create Maven Project:
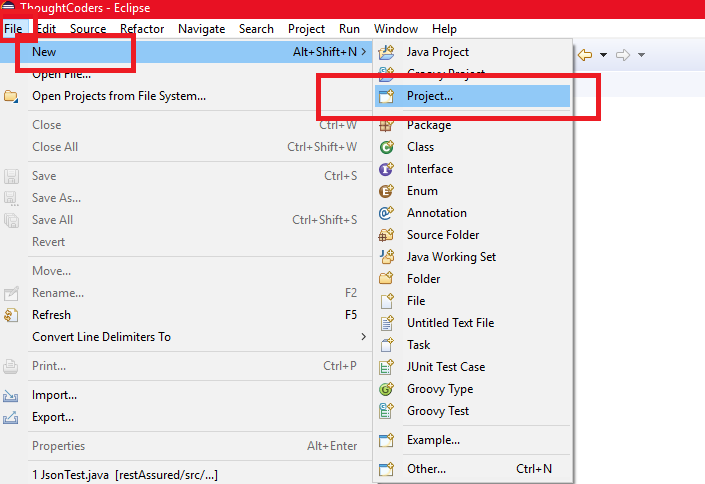
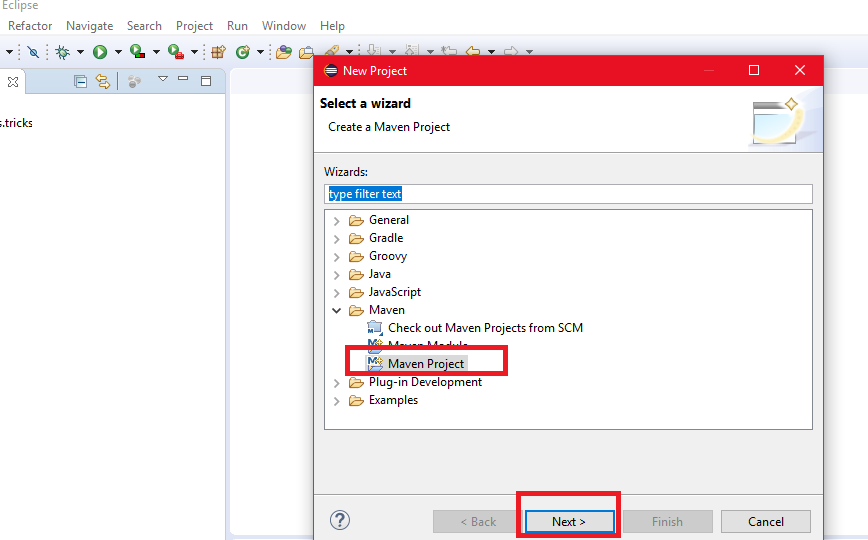
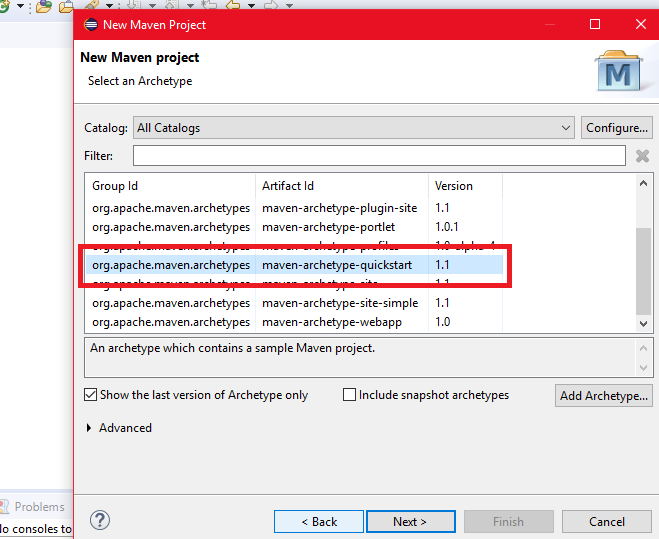
- Create New Maven Project > Select Maven Project and click on Next and Next > Select Maven archType “maven-archtype-quickstart” and click Next > Enter Project artifacts as per the below snapshot and click on “Finish”.
Open Eclipse and go to File> New >Project

- Click on Eclipse “Help” and go to Eclipse “Eclipse Marketplace”. Install Cucumber Plugins. Refer below for snapshots:
- Cucucmber Eclipse Plugin
- Natural 0.0.7.6


Maven Project structure before Cucumber & Natural plugin dependency
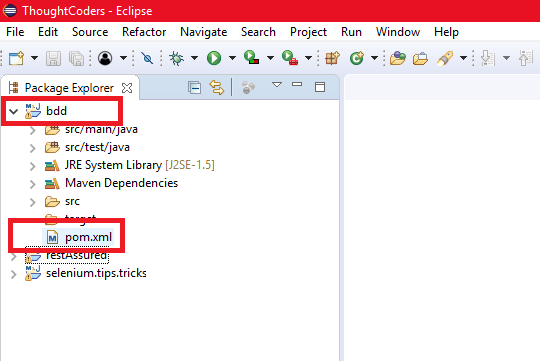
Add Cucumber Dependency at POM.XML
- Open POM.xml and add Cucumber dependencies:
- cucumber-java
- cucumber-junit
- junit
Add below dependencies in POM.xml- under dependencies tag
<dependency>
            <groupId>junit</groupId>
            <artifactId>junit</artifactId>
            <version>3.8.1</version>
            <scope>test</scope>
        </dependency>

        <dependency>
            <groupId>io.cucumber</groupId>
            <artifactId>cucumber-java</artifactId>
            <version>5.4.0</version>
            <scope>test</scope>
        </dependency>
        <dependency>
            <groupId>io.cucumber</groupId>
            <artifactId>cucumber-junit</artifactId>
            <version>5.4.0</version>
            <scope>test</scope>
</dependency>- Add WebDriver Manager dependency and Selenium Server in POM.xml. WebDriver Manager is used to manage Browser Binaries automatically and Selenium Server is used to perform operations on Browser.
<dependency>
            <groupId>io.github.bonigarcia</groupId>
            <artifactId>webdrivermanager</artifactId>
            <version>3.8.1</version>
            <scope>test</scope>
        </dependency>
<dependency>
    <groupId>org.seleniumhq.selenium</groupId>
    <artifactId>selenium-server</artifactId>
    <version>3.141.59</version>
</dependency>
After adding the above dependencies your final POM.xml is like below:
<project xmlns="http://maven.apache.org/POM/4.0.0"
    xmlns:xsi="http://www.w3.org/2001/XMLSchema-instance"
    xsi:schemaLocation="http://maven.apache.org/POM/4.0.0 http://maven.apache.org/xsd/maven-4.0.0.xsd">
    <modelVersion>4.0.0</modelVersion>
    <groupId>thoughtCoders</groupId>
    <artifactId>bdd</artifactId>
    <version>0.0.1-SNAPSHOT</version>
    <packaging>jar</packaging>
    <name>bdd</name>
    <url>http://maven.apache.org</url>
    <properties>
        <project.build.sourceEncoding>UTF-8</project.build.sourceEncoding>
    </properties>
    <dependencies>
        <dependency>
            <groupId>junit</groupId>
            <artifactId>junit</artifactId>
            <version>3.8.1</version>
            <scope>test</scope>
        </dependency>
        <dependency>
            <groupId>io.cucumber</groupId>
            <artifactId>cucumber-java</artifactId>
            <version>5.4.0</version>
            <scope>test</scope>
        </dependency>
        <dependency>
            <groupId>io.cucumber</groupId>
            <artifactId>cucumber-junit</artifactId>
            <version>5.4.0</version>
            <scope>test</scope>
        </dependency>
        <dependency>
            <groupId>io.github.bonigarcia</groupId>
            <artifactId>webdrivermanager</artifactId>
            <version>3.8.1</version>
            <scope>test</scope>
        </dependency>
        <dependency>
            <groupId>org.seleniumhq.selenium</groupId>
            <artifactId>selenium-server</artifactId>
            <version>3.141.59</version>
        </dependency>
    </dependencies>
</project>
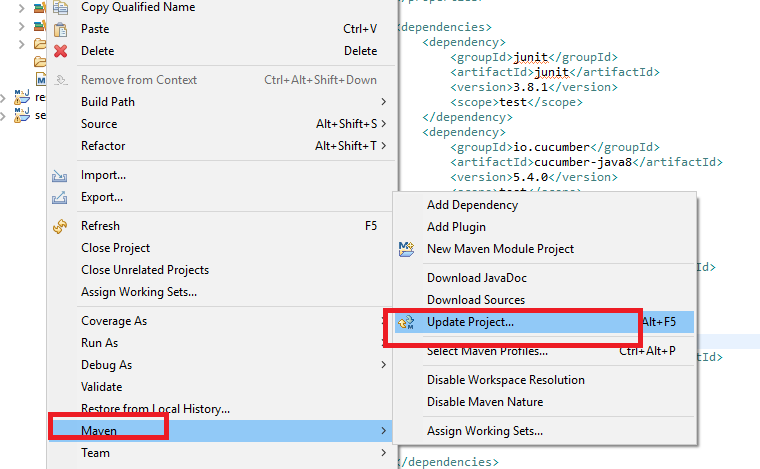
- Update Project: Right Click on Project and go to Maven and then click on “Update Project”.
- After Project Update, again click on “Maven Install”.
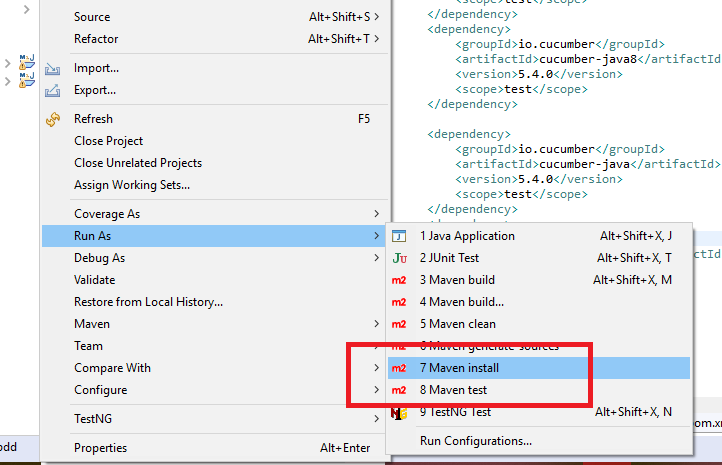
Note:- After Maven Install – Console output should have Build success.

Now your project is configured with all the required Jars and Eclipse Plugins.
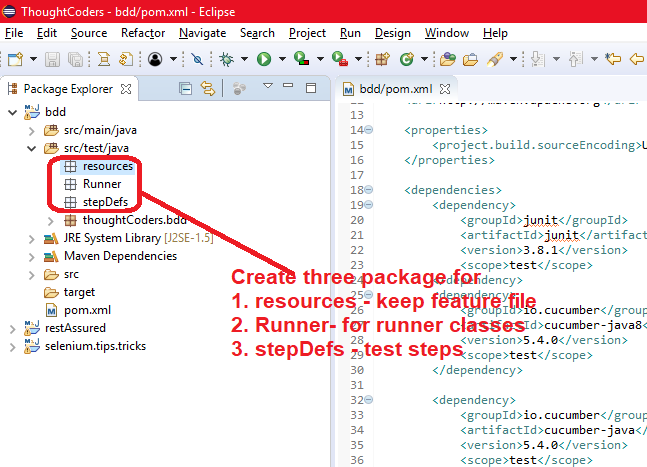
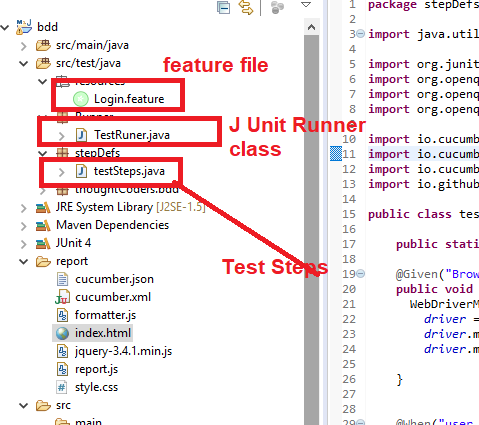
- BDD Project have three major components. The first one is “Runner class”, “Feature File” and “Step Definition”. So you need to create three packages:
- resources Folder: to keep your feature files inside this folder.
- Runner Package: Create Runner class inside this package. To run feature files and customize runner options.
- stepDefs Package: All the test steps implementation code will keep in this package.
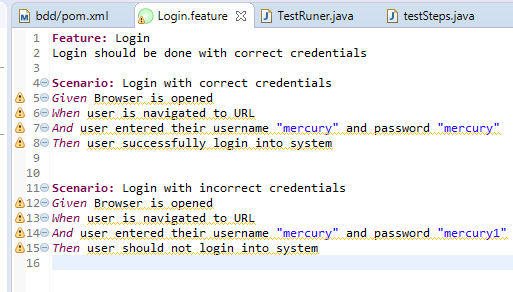
- Write the first feature file. Go to the resources folder and right-click on it create “Login.feature” file and write test scenarios in Gherkin language:

Feature: Login
Login with correct credentials
Scenario: Login with correct credentials
Given Browser opens
When a user navigates to URL
And user entered their username “mercury” and password “mercury”
Then user successfully login into the system
Scenario: Login with incorrect credentials
Given Browser opens
When a user navigates to URL
And user entered their username “mercury” and password “mercury1”
Then the user should not log in into system
- Go to stepDef package and create testSteps.java class and implement all the test steps as per below:
package stepDefs;
import java.util.concurrent.TimeUnit;
import org.junit.Assert;
import org.openqa.selenium.By;
import org.openqa.selenium.WebDriver;
import org.openqa.selenium.chrome.ChromeDriver;
import io.cucumber.java.en.Given;
import io.cucumber.java.en.Then;
import io.cucumber.java.en.When;
import io.github.bonigarcia.wdm.WebDriverManager;
public class testSteps {

    public static WebDriver driver;

    @Given("Browser is opened")
    public void browser_is_opened() {
         WebDriverManager.chromedriver().setup();
        driver = new ChromeDriver();
        driver.manage().window().maximize();
        driver.manage().timeouts().implicitlyWait(30, TimeUnit.SECONDS);

    }

    @When("user is navigated to URL")
    public void user_is_navigated_to_URL() {
        // Write code here that turns the phrase above into concrete actions
        driver.get("http://newtours.demoaut.com/");
    }
    @When("user entered their username \"(.*)\" and password \"(.*)\"$")
    public void user_entered_their_userName_and_password(String userName, String password) {
        driver.findElement(By.xpath("//input[@name='userName']")).sendKeys(userName);
        driver.findElement(By.xpath("//input[@name='password']")).sendKeys(password);
        driver.findElement(By.xpath("//input[@name='login']")).click();
    }
    @Then("user successfully login into system")
    public void user_successfully_login_into_system() {
        String winTitle = driver.getTitle();
        Assert.assertEquals(winTitle, "Find a Flight: Mercury Tours:");
        driver.close();
    }
    @Then("user should not login into system")
    public void user_should_login_into_system() {
        String winTitle = driver.getTitle();
        Assert.assertEquals(winTitle, "Sign-on: Mercury Tours");
        driver.close();
    }
}- Go to Runner Package and create TestRunner.java class and implement the below code:
With @CucumberOptions we can pass parameters in following purposes:
- features= “src/test/java/Resources”— Path of feature File.
- glue = {“stepDefs”}- Path of step Definition Folder
- plugin = {“pretty”,”html:report”,”json:report//cucumber.json”,”junit:report//cucumber.xml”- For report customization, path and output Directory.
- dryRun =false – dryRun to check whether all the steps are implement or not. By default it is false. But when you want to check missing steps of feature then make it “true”. It will give missing test steps methods.
- Monochrome= true- to format console output from Cucumber in the formatted manner(Readable). If you want a well-formatted console message then you have to set “true”. By default it is false.
- Strict =false: For example, if you want to skip undefined steps from execution, then you have set “false”. By default value is false.
package Runner;
import io.cucumber.junit.Cucumber;
import io.cucumber.junit.CucumberOptions;
import org.junit.runner.RunWith;
@RunWith(Cucumber.class)
@CucumberOptions(
        features= "src/test/java/Resources",
        glue = {"stepDefs"},
        plugin = {"pretty","html:report","json:report//cucumber.json","junit:report//cucumber.xml"},
        dryRun =false,
        monochrome =true

        )
public class TestRuner {

}
Maven Project Structure with Cucumber and Natural Plugin
- Go to TestRunner class and run the test.
- After test execution, right-click on Project and Refresh. Again go to Report Folder and open HTML report. You will find the cucumber report.

The above report is the default cucumber report. There are many open-source plugins are available to create attractive reports. A few popular plugins to generate reports are Allure Report, Master Thought, Extent Report, and Testng Report. To configure these reports check our blogs.
Hope the above steps help you to create bdd project with Selenium + Cucumber or to set up the first BDD Cucumber project and execute it. Feel free to share your feedback and refer to another post for more tutorials on Automation. Also, contact us for more details on our Services, you may also join us on Facebook and LinkedIn.


I have used the same dependency in pom.xml file but i am getting the eeror in Runner class
–>Class<Cucumber> cannot be resolved to a type
–>Cucumber Options cannot be resolved to a type
Please share your error on thoughtcoders@hotmail.com