
Appium Setup: A Comprehensive Guide
In the world of mobile automation testing, Appium has become a go-to tool for testers. It supports a wide range of platforms including Android, iOS, and Mobile Web, making it versatile and widely adopted. To get started with Appium, it’s essential to set up your development environment properly. This guide will walk you through the installation and configuration of the Java Development Kit (JDK), Android Studio, the Android SDK, Appium Desktop, and setting up a Maven project in an IDE like IntelliJ IDEA or Eclipse. We’ll also cover the necessary environment variable configurations.
For Appium server you should have these things
- Java Development Kit (JDK)
- Node.js (LTS version recommended). Verify the installation with node
- Android Development Environment (for Android Testing)
Install Appium via npm:
npm install -g appium
- Appium Inspector (Optional). For inspecting mobile app UI elements.
- Mobile Devices or Emulators : you can use your own Android or iOS devices connected via USB. OR Android AVD or iOS Simulator.
- Text Editor or Integrated Development Environment (IDE) like Visual Studio Code, IntelliJ IDEA, Eclipse, PyCharm, etc.
Installing Java Development Kit (JDK)
Download the JDK :
Visit the official Oracle website to download the latest JDK version for your operating system.
Install the JDK :
Run the downloaded installer and follow the prompts to install the JDK on your computer.
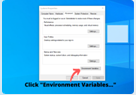
Set Environment Variables :
Configure your envirement variable to point to the JDK installation directory, enabling your system to recognize the JDK.
How to setup “Node.js”
Download and Install Node.js (Step by Step guide to install NodeJs)
Windows/MacOS/Linux:
- Visit the official Node.js website.
- Download the LTS (Long Term Support) version, as it is more stable.
- Run the installer and follow the on-screen instructions.
- The installer will also include npm (Node Package Manager).
Verify Installation
- Open a terminal or command prompt and type the folmands:
- Write “node -v ” on your command prompt and enter
- For check npm version enter this command “npm -v” in your command prompt
- You should see the versions of Node.js and npm printed out, confirming that they are installed.
Setting up Android Studio and Configuring the Android SDK
Install Android Studio :
Download the latest Android Studio from the official website and install it on your computer. The installer will also download necessary components, including the Android SDK, which provides tools and libraries for Android development.
Configure the Android SDK :
Launch Android studio and install the required SDK components for your desired target devices. You can select specific Android API levels, system images, and other tools based on your testing needs.
Create an Emulator :
Inside Android Studio, create an Android Virtual Device (AVD) emulator to simulate different Android devices and versions. This allows you to run your tests on a virtual device without needing physical hardware.
Configuring Environment Variables
Variable Name :
 Value
Value
JAVA_HOME :
- Open your system’s environment variables settings.
- Create a new variable JAVA_HOME and set it to the JDK installation path (e.g., “C:\Program Files\Java\jdk-<version>”).
ANDROID_HOME :
- Create a new variable ANDROID_HOME and set it to the Android SDK path (e.g., “C:\Users\<username>\AppData
- \Local\Android\Sdk”).
PATH :
- Include the bin directories of the JDK, Android SDK, and Appium installation in your system’s PATH variable.
Manually Starting and Stopping Appium Server
Start Appium Server:
- Open a terminal or command prompt.
- Run the following command to start the Appium server: (appium)
- This will start the server on the default port (4723).
Stop Appium Server:
- In the terminal or command prompt where the server is running, press Ctrl + C to stop the server.
Add Appium Capabilities:
desiredCapabilities caps = new DesiredCapabilities();

 caps.setCapability("platformName", "Android");

 caps.setCapability("deviceName", "emulator-5554");

 caps.setCapability("app", "");
Installing Appium Desktop and Setting It Up
Download Appium Desktop :
- Visit the Appium website and download the latest version of Appium Desktop for your operating system.
Install Appium Desktop : 
- Run the downloaded installer and follow the prompts to install Appium Desktop on your computer. This will install the Appium server, which acts as the central hub for managing your tests.
Launch Appium Desktop :
Open Appium Desktop and verify that the server is running successfully. You should see the server status as “Running” in the Appium Desktop interface.
Setting Up a Maven Project for Appium
Create a Maven Project :
- Use an IDE like IntelliJ IDEA or Eclipse to create a new Maven project. This will provide you with a structured project environment for writing your Appium tests.
Add Appium Dependencies : 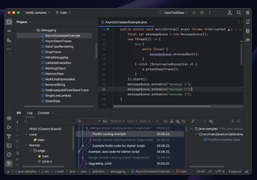
- Add the necessary Appium dependencies to your project’s pom.xml file. These dependencies will include libraries and frameworks for interacting with mobile devices using Appium.
Set Up Test Classes :
- Create test classes within your project, where you will write your Appium test scripts using Java and the Appium client library.
Write Test Scripts :
- Write test scripts using Java and the Appium client library. You will use Appium’s APIs to interact with your app’s UI elements and automate test scenarios.
Starting the Appium Server:
To start the Appium server in Java, you can use the ProcessBuilder class to run the command-line instructions that you would normally use to start the server manually.
import java.io.IOException;

public class AppiumServer {
private Process process;
public void startServer() throws IOException {
    // Set the command to start the Appium server
    ProcessBuilder builder = new ProcessBuilder("cmd.exe", "/c", "appium");
    builder.redirectErrorStream(true);
    process = builder.start();
    System.out.println("Appium server started!");
}

p
    }
}

public static void main(String[] args) {
    AppiumServer appiumServer = new AppiumServer();
    try {
        appiumServer.startServer();
        // Add your test code here

        // Stop the server after the test
        appiumServer.stopServer();
    } catch (IOException e) {
        e.printStackTrace();
    }
  }
}
Verifying the Setup
Run a Sample Test :
- Create a simple Appium test script to interact with a mobile app. This will allow you to test if the environment is properly configured and working as expected.
Inspect App Elements :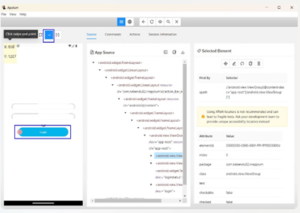
- Use Appium Desktop’s Inspector tool to inspect your mobile app’s UI elements. This will help you identify the correct locators for interacting with elements in your test scripts.
Verify Test Execution :
- Run the sample test script using Appium Desktop. Observe the test execution and verify that it is interacting with your app’s UI elements correctly.0
Next Steps
Write Automated Tests :
- Start writing comprehensive automated test scripts to cover various aspects of your mobile app, including functionality, usability, and performance.
Identify and Fix Bugs :
- Run your automated tests regularly to identify bugs and issues early in the development cycle. Fix any bugs promptly to ensure a stable and reliable app.
Analyze Test Results :
- Analyze the results of your automated tests to identify areas for improvement. Track metrics like test coverage, execution time, and bug frequency to monitor the app’s quality.

“Have questions or need support? We’re here to help! Reach out to us any through our contact form, email, or phone. We’re just a message away!