Measure API Performance with JMeter [Step by Step Guide]
In continuation of JMeter tutorials, our team brings amazing step by step guide on API Performance Testing with JMeter. This tutorial helps you in JMeter API test creation, configure load, execution and generate HTML report which can be published to business.
JMeter is the perfect tool for API performance measurement. JMeter have one sampler –“HTTP Request” which provides all the essential fields to configure API data – Base URL, end points, methods (GET, POST, PUT etc), body data and also provide great collections for assertions to validate API response.
This is the first tutorial on API performance testing with JMeter. Refer below for step by step guide and explanation:
Pre requisite:
Before proceeding with actual configuration following pre requisite should be done:
- Java should be installed ( if not then click here for Java installation steps)
- JMeter binaries file should be downloaded and unzipped ( if not then click here for JMeter step guide)
Once pre requisite done, you may follow below steps :
Step 1: Launch JMeter: To launch JMeter Go to J Meter bin directory and click on jmeter.bat

Step 2: Steps to Create New Test Plan:
Once JMeter open then click on File> New
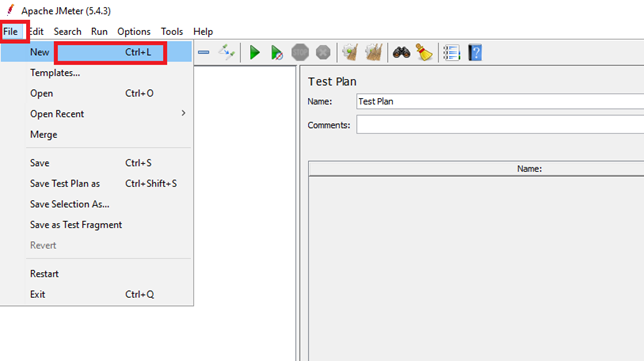
Step 3: Now enter Test Plan name and comments

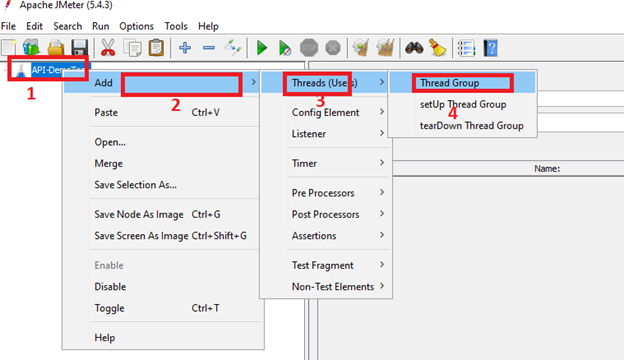
Step 4: Right Click on Test Plan > Then click on Add then Threads (Users) and Then thread Group
- Right click on Test Plan
- Click on Add
- Choose Threads (Users)
- Click on Thread Group
Step 5: Configure JMeter Threads:
- Enter JMeter Thread Name
- Enter Users count
- Enter Ramp Time as per you test case ( you may enter 30 seconds )

Step 6: Add Sampler:
Right click on Thread Group and then Sampler and then add HTTP Request

Step 7: Enter API request Details: ( Refer snapshot for each fields details)
- Protocol: Enter protocol (http/or https) whatever support you application
- Enter base URI
- Enter end Point for request
- Choose Method: As per you request, you may choose Methods – POST, PUT,
- Body Data: You may enter Body data( JSON) in JMeter Body Data field

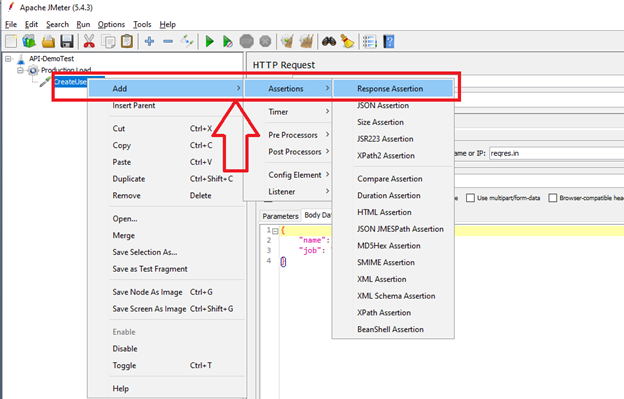
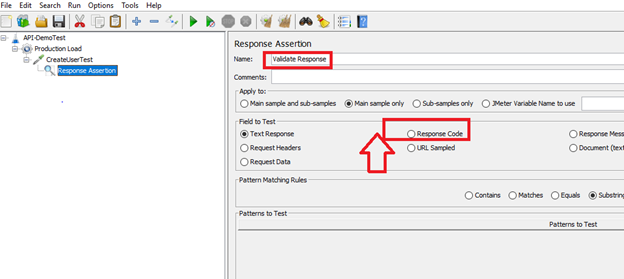
Step 8: Add Assertions
Right click on API request and Add Assertions (Response Assertions) for API Test and add Response Assertion.
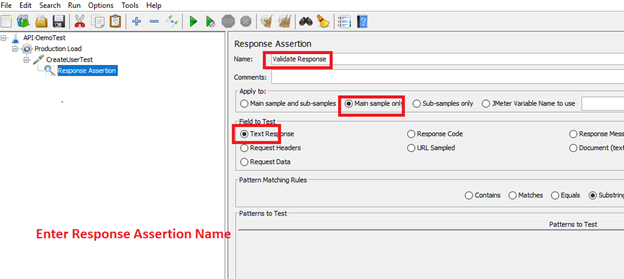
Step 9: Configure Assertion:
- Choose Main Sample Only
- Choose Field to Test
- Choose Response Code to assert status code and click on add to pattern “200” (expected response code)
- Choose Text Response to validate text in response
Similarly you may choose other assertions (as per you test case)
Refer below snapshot:
Choose Assertion Type and enter expected value
Step 10: Enter expected Value for Assertion

Step 11: Add Listeners for Report: Listeners is a component: Listeners provided by JMeter to see the results of samples:
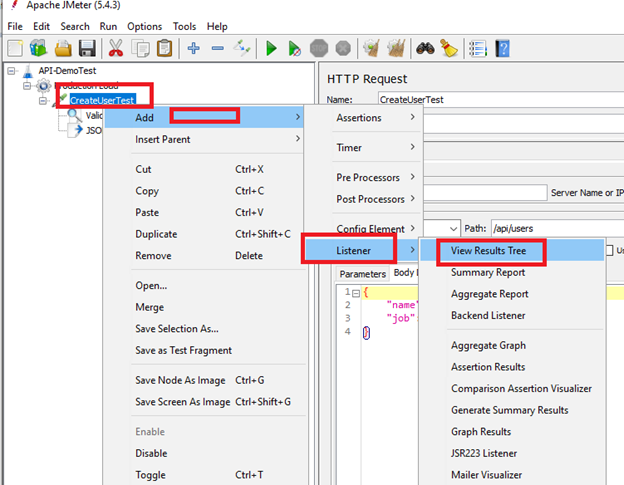
Step 12: Go to Listeners and enter the file path where you want to save JMETER execution results.

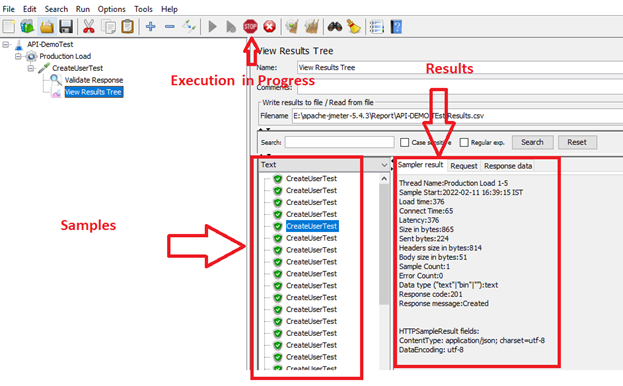
Step 13: Run your performance Test from Run button.: As per given screenshot, click on Run button to trigger API Test with JMeter

Step14: Real time verification of JMeter API Test execution:
During test execution, you may see result of running request response. For this, go to listeners section and click on “View Results Tree” and click on Response Data and validate response.
Once execution complete, then run button will be enabled.
Step 15: Verify your performance Testing Results: API execution report saved on your local machine (Navigate to path given in step 11) and open csv file. You will get report in CSV file.

Congratulation!! You have completed your first API Performance Test with JMeter. Hope you didn’t faced any issue still if you need any assistance feel free to write us on info@thoughtcoders.com. ThoughtCoders provides JMeter expert level training, to join our training program you may Contact Us at +919555902032.